.png?width=150&height=150&name=CRL%20GOAT%20Logo%20(4).png)
.png?width=1500&height=2000&name=2024%20Map%20(1).png "2024 Map (1)")
About the Journey Map
Dr. Derek Cabrera 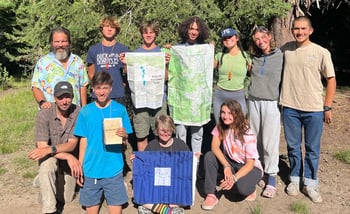 developed the Journey Map as a staff trainer and CD after repeatedly encountering questions from Outward Bound (OB) instructors about handling problematic behaviors during courses and what made the outcome of courses so different. The Journey Map is based on several key concepts.
Key Concepts:
-
Medium vs. Message: The Journey Map redefines the Outward Bound experience by focusing on the message rather than the medium, using conscious metaphors to guide internal journeys, ensuring content is based on scientific research, and addressing the issue of transfer. This proactive and reflective approach prepares instructors and students for real-life challenges, making the OB experience deeply meaningful and transformative.The mountains are the medium, not the message. The physical itinerary serves as a backdrop for the real journey, which is personal and interpersonal growth. The Journey Map aims to remedy the central misunderstanding (for students and staff) of what constitutes an OB course: the mountains are the medium, not the message. Subsequently, the oft-sought-after itinerary is a description of the medium, not the message. The Journey Map consciously uses metaphor to highlight the message of the course, which is an external and internal journey of both discovery and self-discovery. It aims to "map" internal-world OB course onto the external-world OB course, focusing on the conscious use of metaphor to aid with the all-important transfer of the experience to real-life. The Journey Map takes a proactive and systemic approach, emphasizing reflection, social contracting and personal and interpersonal mastery. It removes pressure from the mountains and shifts the focus onto intra- and interpersonal dynamics. The Journey Map aims to reduce the aged problem of lack-of-transfer (which is perennial at OB) by making reflection on experience explicit and highlighting the importance of organizing information to make meaning of experiences (aka mental models). It uncovers the great twin misconceptions of OB that: (a) "the mountains teach for themselves (they don't, we have to assist) and (b) "we learn from experience" (we don't). The mountains are a medium, they do not teach. The primary reason we use the mountains (or the sea, etc.) is because it tends to be foreign to students, thereby providing challenges to be overcome. Likewise, OB instructors need mountain training and fitness primarily so that the challenges of the mountains and fitness are not a distraction from focusing on and facilitating the real message. In fact, as the late CI, Doug Mahon, was fond of saying, "If you were a solid-enough instructor, an OB course could be taught under the kitchen table.”). And, we are reminded of the old adage, "If you're okay, your students are tired. If you're tired your students are exhausted. If you're exhausted your students are dead." Finally, it must be underscored that--contrary to popular belief--humans do not learn from experience. If we did, it wouldn't be the case that we so often need to experience things again and again to learn from them. In fact, we learn from reflection on experience. The great thing about the medium of reality (the mountains, etc.) is they are constantly teaching us lessons if we are listening, and if we are not listening (metacognitively reflecting) then reality will repeat the lesson again and again until it is learned. The Journey Map makes metacognitive reflection explicit and targeted on the takeaway and transferable message rather than the medium.
-
Conscious Use of Metaphor at OB:
 The Journey Map uses metaphors to highlight the course's true message, aiding in the transfer of the OB experience to real-life situations. In summary, the Journey Map is a proactive approach to teaching that emphasizes personal and group development through the conscious use of metaphor. It shifts the focus away from the mountains and onto the journey itself, emphasizing personal mastery and reflection on experience to make meaning of it. By doing so, it prepares instructors and students to anticipate and handle problematic situations while reducing real-life recidivism of dysfunctional behaviors and transferring the experience into real-life situations. The Journey Map captures and explicates the message (the itinerary of the journey) allowing the mountain itinerary to remain as merely the medium (which could be replaced by nearly any other medium).
 -
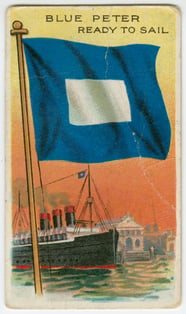
Parallel Journeys Require Parallel Maps: Just as topo maps guide navigation of the physical terrain, the Journey Map navigates cognitive, emotional, and social terrains, ensuring a comprehensive approach to the OB experience. The perceived need for students to understand, and for staff to communicate, the “itinerary” of an OB course is precisely the problem the Journey Map seeks to address. While the mountains or any other environment may serve as the medium for the experience, they are not the core message of the course. Providing students with a detailed itinerary that solely describes the physical activities can be misleading, as it does not capture the true essence of the journey. The Journey Map leverages metaphor to highlight the message of the course, emphasizing that Outward Bound is not just about exploring the outdoors, but also about discovering oneself and others and transferring this learning to real-life situations. Outward Bound represents a voyage into the unknown, both externally and internally, that is marked by both discovery and self-discovery. The Journey Map encompasses this essential aspect of the Outward Bound experience, fusing the external and internal experiences by capturing the unknown. While the outcomes of the journey cannot be predicted, adhering to simple rules (or "stays" of a tent): stay together, stay present, stay frosty, and stay on course can help ensure a safe and enriching experience. As John A. Shedd once said, "A ship in harbor is safe, but that is not what ships are built for." The Blue Peter flag, the symbol of Outward Bound, signifies a ship that is "ready to sail" or "outward bound" for a journey unknown.
-
Increasing Transfer: Making the Journey Map tangible during all aspects of the course, increases transfer. The Journey Map addresses OB's perennial problem of lack of transfer. The map makes the more intangible message and experiences explicit, tangible, and daily and therefore increasing reflection. Thus, it ensures that the lessons learned during the course are effectively transferred to real-life situations, enhancing the lasting impact of the OB experience. Transfer--as far as learning theory goes--is the "Holy Grail" of learning, because it allows us to learn one thing and apply it in many areas.
-
Proactive/Systemic vs. Reactive/Linear Instruction: The Journey Map promotes a proactive approach, encouraging anticipation and preparation for potential issues, fostering a reflective systemic practice rather than reacting to problems as they arise. The Map helps us to see the course as a dynamic system--with webs of causality rather than linear causality. Many of the questions Dr. Cabrera received as a CD and LI when training new staff where different on the surface but the same underneath. Common questions included: What do I do when a student wants to quit?, What do I do when we have a group blow-up or conflict?, What do I do when a group wants to kick someone off the course?, What do I do when I find drugs?, and What do I do when we have exclusive relationships? These questions reflected a linear and reactive rather than a systemic and proactive approach. Dr. Cabrera realized the need for a shift in perspective—preparing instructors and students to anticipate and handle such situations proactively. This approach turns challenges into opportunities for personal and group development, rather than defaulting to sending students home or letting the collective dysfunction "run" the course. The common thread in these questions was the word "when," indicating a reactive rather than proactive approach to teaching. Dr. Cabrera realized that if instructors were asking these questions, it was already too late to prepare for these occurrences. Instead, instructors should anticipate such situations and prepare themselves and their students accordingly. Dr. Cabrera also observed a trend among instructors to be quick to "send kids home" or "emo evac," which ignores the fact that these students were sent to OB for precisely this problematic behavior (or in the case of standard population, chose to come on the course to resolve or get clarity on such dysfunctional behavior). He utilized his experience with Restorative Justice techniques to develop a plan that turned these situations into opportunities for personal and group development.
-
Evidence-Based Curriculum: The Journey Map is, importantly, grounded in scientific research and practice, ensuring that its concepts are validated and effective, rather than based on instructor opinions or the prevailing basecamp politics. The Journey Map was originally developed at and for Outward Bound but it has since been adapted to manage classrooms, STEM programs, experiential excursions of all kinds, and even whole school districts. Today's version of the Journey Map combines Dr. Cabrera's three+ decades as an Outward Bound Instructor with his work as a cognitive systems scientist. In its current form, the Journey Map is a "mash up" of Outward Bound pillars and principles and the latest scientific research in cognitive science, neuroscience, as well ad human development at the individual/psychological level and group dynamics and systems science at the group/sociological level. First and formost among these ideas is primacy of mental models and the role they play in development and learning.
Below, we describe its use in its original setting of Outward Bound courses. The Journey Map can be introduced at any time but I introduce it at the start of the course as the focus of the intro course talk to students, which could be made either at the course-level by the CD or at the patrol-level by the LI. The map itself can be adapted to include different variations of what the CD/LI deems important during the design of the course. But try not to stray too far away from the science of what actually works.
Overview
The Parallel Journey Map is designed to navigate the cognitive, emotional, social, and developmental terrain alongside the physical terrain. Just as topographic (topo) maps help you navigate physical landscapes, the Parallel Journey Map helps you understand and traverse the internal landscapes that are ever-present and intertwined with your physical journey. The core idea is to use this map the same way you use a topo map, but for the inner journey that accompanies your outer adventure. Below, we outline its use within the context of Outward Bound (OB) courses, but the principles can be adapted for other settings.
Step 1: Introduce the Map Alongside Topo Map as a Map of the Parallel Terrain
 You can pull out the Journey Map the same way you would pull out any map. I keep one copy in my front pouch while hiking and another copy is in the map bag with the topo maps. I also make the Journey Map navigation one of the daily jobs that is assigned.
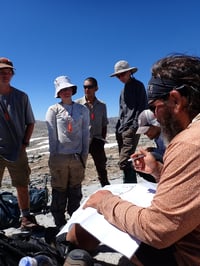
The first time you pull out the journey map put it side by side (parallel) the topo map of the area. Explain that we will need TWO types of maps to navigate this complex terrain: one for the physical terrain and one for the psycho/social domain. Pull out the Parallel Journey Map and begin a story about the journey they will undertake together. Highlight some of the bigger concepts on the map. As questions arise, frame them metaphorically and connect them to places on the map. For example, if a student asks about a challenging part of the course, you might refer to "Fear Mountain," explaining that it often turns out to be more of a molehill. Help students understand that the focus should be on staying present rather than worrying about future logistics. Explain the metaphorical scale of the map and consider using the "Park Rules" as the basic rules for your course (there are some deep concepts within these rules!). With some groups, you can use the Journey Map and a "Park permit" as a social contract. This is an indispensable tool with challenging groups. If you do use the map as a social contract have them sign the park permit and explain that signing this contract is a commitment to the journey and to the group. This contract will serve as a reference point for group behavior and conflict resolution throughout the course. In moments of conflict or difficulty, refer back to the contract to remind the group of their commitments and to guide them through resolving issues constructively.
Step 2: In-the-Field Application
 Make it Part of the Daily: Just like you assign daily navigators, cooks, sweep, latrine, etc. Assign students to the Journey Map. They can stay up front with the topo navigators or behind keeping an eye on the macro situation. Navigating Challenges: When challenges or conflicts arise in the field, treat them as you would treat being physically lost. Pull out the map and ask the group to identify where they think they are metaphorically. This initiates a conversation and reflection process, making the situation less daunting and more manageable. Adapting the Map: If a situation doesn't have a pre-defined metaphorical place on the map, add a new one with a permanent marker or grease pen, just as you might name an unnamed peak.
In the field, when something happens (X), do what you would do when you think you're lost--pull out the map from the map bag! Lay it out, get your stick or pine needle and ask them, "this thing X just happened, where do you all think we are?" From there the conversation starts and the reflection begins. It makes negotiating conflict or tense situations less scary because there is a map that somewhat presciently "predicts" that its a place that they may have ended up. If the situation has no metaphorical place on the map, that's okay, just add a place with a pen like you would name an unnamed peak. Example: If the "X" is that a student wants to go home (for reasons that don't require it; the most egregious failure of an OB course because it will establish a pattern of quitting when things are challenging), the map can be very valuable. Simply bring out the contract and gather the group around, explain the situation, and say, "where are we?" And a Circle Up will occur where 9 times out of 10the group will facilitate itself back to staying together and finishing together.
Step 3: Parallel-Journey Transfer
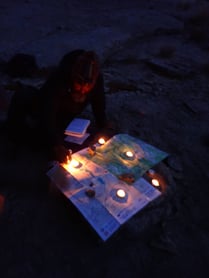 Continuous Use: Use the Journey Map throughout the course as the primary metaphor for navigating the inner journey. This includes during the course end pin ceremony, evening circles, teachable moments, and peak ascents. Adding Content: The map can be customized with new place names and concepts using a dry erase or grease pencil. Ensure that any new frameworks or models added have empirical validity to maintain the map's accuracy and usefulness.
The Journey map is used for parallel-journey transfer (physical topo map = physical world, journey quad map = mental world). Used correctly it becomes the primary metaphor for the course and is a powerful culture builder upon which the entire course sits (i.e., course end pin ceremony, evening circles, teachable moments, peak ascents, etc.). Using a dry erase or grease pencil (which I carry on course), new place names can be added to the map. Additionally, the map provides a base metaphor for parallel-map transfer and therefore can include any content you like (meaning you can adapt the concept to your needs). But, one caveat about adding new "frameworks:" you should ask yourself if there is any empirical basis for the framework you are adding or is it just some person's opinion. Many of the models and frameworks I hear or see cited by OB writ large lack validity. What does that mean--"lack validity"? It means that when the model is tested it doesn't turn out to be real, true, accurate, valid, etc. Now ask yourself this: if I handed you a topo map of SEKI and then told you, "its a really nice map, the problem is none of the places on it are accurate" would you bring it with you on course? Would you use it to navigate? Well, the same is true for the parallel journey map. The stuff on it should be validated. The ideas on the current map all have an empirical (evidence) basis.
Conclusion
The Parallel Journey Map, combined with the Inner-Outer Guidebook, serves as a powerful tool for instructors. It helps participants navigate their inner landscapes with the same confidence and clarity as they navigate the physical terrain, fostering growth, resilience, and deeper understanding.
The Journey Quad, in combination with the Inner-Outer Guidebook, they are powerful instructor tools.
